
Views: 239 Author: Waigaoqiao Co.,Ltd Publish Time: 2026-09-29 Origin: Waigaoqiao Co.,Ltd
Content Menu
● Why white wire shelf removal requires care
● Identify your wire shelving system first
● Tools you need to remove white wire shelves
● How to remove white wire shelves step by step
>> Step 1: Empty and clean the shelf
>> Step 2: Photograph the original installation
>> Step 3: Remove angled support braces first
>> Step 4: Lift the wire shelf out of rear clips
>> Step 5: Remove screws or nail pins before removing clips
>> Step 6: Remove plastic wall clips and anchors carefully
>> Step 7: Remove side brackets and wall rails
● How to repair wall holes after wire shelf removal
>> For small nail and screw holes
>> For torn drywall paper or enlarged holes
● Common mistakes that damage walls
>> Pulling the shelf before releasing supports
>> Ripping out clips with fasteners attached
>> Using a claw hammer directly on drywall
>> Throwing away reusable components too quickly
● Expert guidance for reuse, replacement, and recycling
● Upgrade your shelving with Waigaoqiao
● FAQ
>> Can I remove white wire shelves without damaging drywall?
>> What is the best tool for removing wire shelf clips?
>> Do I need to remove angled shelf supports first?
>> How do I remove wire shelf brackets with nails?
>> Can I reuse old white wire shelves?
>> What should I do if a plastic wall anchor breaks?
>> How do I patch holes left by wire closet shelving?
At Waigaoqiao, we have manufactured metal wire racks and garment display systems for international brands, wholesalers, and manufacturers since 2003. We know that even a simple question—how to remove white wire shelves—can turn into a frustrating repair job when clips, anchors, drywall, and paint are handled in the wrong order.
The safest method is straightforward: remove the wire shelf first, release support hardware second, remove nails or screws before pulling plastic anchors, then patch and repaint the wall. The critical rule is never to yank a shelf clip or bracket out while its fastener is still engaged. That is how small mounting holes become torn drywall and large repair areas.

White wire shelving is popular in closets, pantries, laundry rooms, garages, retail stockrooms, and utility spaces because it is affordable, ventilated, light, and easy to configure. Most systems use a powder-coated or vinyl-coated steel wire shelf held in place by a combination of:
- Rear wall clips or shelf support clips
- Side-wall or end brackets
- Angled support braces
- Plastic anchors with metal locking pins
- Screws, nails, or drywall anchors
- Vertical tracks and adjustable brackets in commercial installations
The shelf itself is usually not difficult to remove. The challenge is the hardware embedded in the wall.
Many homeowners make the same mistake: they pull directly on a plastic clip, assuming it will pop out cleanly. In practice, the fastener may still be gripping the drywall. Pulling at an angle can tear the paper face of the drywall, enlarge the hole, crack surrounding joint compound, or pull out a chunk of gypsum board.
For this reason, the best approach to removing white wire shelves is not brute force. It is a controlled disassembly process.
Before you begin, inspect the installation. Different white wire shelf systems use different mounting hardware, and the removal sequence changes slightly depending on what you find.
| Shelving type | Common mounting method | Best removal approach |
|---|---|---|
| Fixed closet wire shelf | Rear plastic clips, side brackets, angled braces | Remove shelf, then fasteners, then clips |
| Wire pantry shelving | Plastic support clips and screws or nails | Lift shelf free and remove each fastener individually |
| Adjustable rail shelving | Vertical wall tracks and metal brackets | Remove shelf and brackets before removing rails |
| Freestanding wire rack | Tapered split sleeves on vertical posts | Release shelf corners with a rubber mallet |
| Heavy-duty garage wire shelf | Steel wall brackets and lag screws | Support shelf weight and remove screws with a drill |
A standard fixed closet shelf commonly has a horizontal rear wall support line, plastic clips along the back, and angled support braces underneath. By contrast, a freestanding white wire rack generally uses posts and plastic split sleeves rather than wall anchors.
Do not assume every white wire shelf comes out the same way. Spend two minutes identifying the system before choosing tools or applying pressure.
Prepare the right tools before you start. Using improvised tools can scratch the white coating, damage the drywall, or make a small repair more difficult.
- Needle-nose pliers
- Small flathead screwdriver
- Phillips screwdriver
- Cordless drill or screwdriver bit set
- Putty knife or 5-in-1 painter's tool
- Small pry bar
- Rubber mallet
- Utility knife
- Safety glasses
- Work gloves
- Drop cloth or cardboard
- Lightweight spackling compound or joint compound
- Drywall patch, if damage is larger than a nail hole
- Fine-grit sanding sponge
- Primer
- Matching interior wall paint
- Small paintbrush or mini roller
A thin, stiff putty knife is especially valuable. Place it behind a pry bar or screwdriver to spread pressure over a larger wall area. This simple step helps prevent dents and torn drywall paper.
Remove all clothing, baskets, boxes, hangers, and stored items from the shelf. Even a lightweight wire shelf can shift unexpectedly once a support clip releases.
Wipe away dust and debris before handling the shelf. This gives you a clearer view of fasteners, cracks, rust spots, and the condition of the white coating.
If the shelf is installed in a closet, remove nearby hanging rods and organizers that could block access to the underside of the shelf.
Before disassembly, take several photos:
- A full-width image of the shelving system
- A close-up of rear clips
- A close-up of angled supports
- A close-up of screws, nails, or locking pins
- A photo showing shelf height and distance from the side walls
This is helpful if you plan to reinstall the shelf later, duplicate the layout in another room, or replace it with a custom wire storage solution.
At Waigaoqiao, we recommend documenting the hardware layout because a shelf's load performance depends on proper support spacing—not simply on the shelf itself.
For a fixed wall-mounted shelf, start with the angled support braces beneath the shelf. These braces often connect the wire shelf to a wall-mounted support point.
Check whether each brace is:
- Hooked into the shelf
- Snapped into a plastic bracket
- Attached with a screw
- Secured by a small metal pin
Support the shelf with one hand while you release the brace with the other. If the shelf is long, ask another person to hold it. Long wire shelves can flex and suddenly swing downward after the final brace is released.
If a brace has a removable locking pin, use needle-nose pliers to grip and pull the pin straight out. Avoid twisting the support aggressively against the wall.
Once angled supports are free, lift the front edge of the white wire shelf upward. In many fixed systems, the rear edge is simply seated in plastic wall clips.
Work gradually from one end to the other:
1. Lift the front edge slightly.
2. Tilt the shelf upward.
3. Release one rear section at a time.
4. Slide or lift the shelf out of the wall clips.
5. Carry the shelf away before removing wall hardware.
If the shelf feels stuck, do not pull hard. It may still be held by a side bracket, a hidden screw, a support rod, or a tight-fitting plastic clip. Use the wooden or rubber end of a mallet for gentle taps if needed. Do not strike the wire with a metal hammer, as this can chip the white finish or deform the shelf.
This is the most important part of learning how to remove white wire shelves without damaging the wall.
For clips installed with screws, use a screwdriver or drill to back the screws out slowly. Hold the plastic clip with your fingers so it does not spin or crack as the screw loosens.
For clips installed with nail-like pins:
1. Insert a small flathead screwdriver under the edge of the metal pin head.
2. Pry gently until the pin rises slightly.
3. Grip the exposed pin with needle-nose pliers.
4. Pull the pin straight out.
5. Remove the plastic clip only after the fastener is fully released.
Removing the metal pin first prevents the anchor from tearing a larger hole in the drywall. Practical removal guides consistently emphasize releasing nails, screws, or locking pins before pulling the clip, because pulling a fully fastened clip can damage the wall surface.
After the screw or pin is removed, the plastic clip may slide out easily. If it does not, grip it with pliers and pull it straight toward you, not sideways.
If a plastic anchor is stuck:
- Score paint around the clip with a utility knife.
- Insert a putty knife behind the clip to protect the wall.
- Wiggle the clip gently while pulling outward.
- Use a small pry bar only with a protective board or putty knife behind it.
- Avoid levering directly against bare drywall.
If the anchor breaks and a portion remains inside the wall, do not dig aggressively into the drywall. In some cases, it is cleaner to push a small broken plastic fragment into the wall cavity, patch the surface, and repaint. This can be preferable to enlarging the hole substantially.
Side brackets may have visible screws or hidden fasteners. Remove screws one at a time while supporting the bracket. If the bracket is painted over, score the paint line with a utility knife first to reduce paint peeling.
For adjustable shelf systems, remove shelves and brackets before taking down vertical rails. Then remove rail screws from top to bottom while holding the rail steady.
For heavy-duty shelving secured into studs, use the correct driver bit and maintain straight pressure. Stripped screw heads create unnecessary delays and may require extraction tools.
Even a careful removal job normally leaves small holes. The good news is that small fastener holes are easy to repair when handled in the correct sequence.
1. Remove loose drywall paper or debris with a utility knife.
2. Press lightweight spackle into the hole using a putty knife.
3. Scrape away excess compound so the surface is flush.
4. Allow it to dry fully.
5. Sand lightly with a fine-grit sanding sponge.
6. Apply primer if needed.
7. Paint with a matching wall color.
If the clip pulled away some drywall paper, trim loose edges rather than smoothing them back into wet compound. Apply a thin sealing coat of primer before adding joint compound. This helps stabilize the damaged paper and reduces bubbling.
For holes larger than about 1 inch, use a self-adhesive mesh patch or drywall repair patch. Apply joint compound in thin layers, feathering the edges wider with each coat. Sand between coats, prime, and repaint.
A shelf may appear loose but still be secured by braces, clips, or side brackets. Pulling it outward can bend the wire, crack plastic components, or gouge walls.
This is the most common cause of drywall damage. Remove the pin, nail, or screw first, then pull the clip straight out.
A hammer can be useful for leverage, but its curved claw concentrates force in a small area. Always place a thin wood shim, cardboard, or putty knife between the tool and wall.
Paint can bind tightly around old clips and brackets. Score around the hardware before removal to reduce peeling beyond the immediate repair area.
If the shelf is still straight, clean, and free from coating damage, it may be useful in a laundry room, garage, pantry, stockroom, or workshop. Separate reusable steel wire shelving from damaged plastic clips and corroded hardware.
Removing white wire shelves is also an opportunity to improve storage performance. Many older closet systems were installed using minimal supports, low-capacity anchors, or layouts that do not match the user's actual storage needs.
At Waigaoqiao, we advise evaluating three areas before reinstalling or replacing shelving:
| Evaluation area | What to inspect | Why it matters |
|---|---|---|
| Shelf condition | Bent wires, coating chips, rust, weld quality | A damaged shelf may snag clothing or lose rigidity |
| Support layout | Spacing of clips, braces, and brackets | Proper support placement improves stability |
| Wall substrate | Drywall, studs, masonry, wood paneling | Fastener selection must match the wall material |
| Intended load | Clothing, folded linens, boxes, retail goods | Heavier loads require stronger support systems |
| Environment | Closet, humid laundry room, garage, retail space | Corrosion resistance and finish quality matter |
For residential use, a white wire shelf can often be reused if it is clean, structurally straight, and free of severe rust. For commercial displays, stockrooms, or branded retail environments, replacement may be the better option when finish consistency, product presentation, custom dimensions, and load requirements matter.
As an experienced OEM manufacturer of metal wire racks and garment display racks, Waigaoqiao supports brands and wholesalers that need reliable, customizable storage and display solutions. We can help match wire diameter, shelf dimensions, coating color, packaging, support hardware, and branding requirements to your market.
Most standard closet wire shelf removals are suitable for capable DIY users. However, call a professional if:
- The shelf is mounted into masonry or concrete.
- You find electrical wiring, plumbing, or unusual wall movement.
- The shelf supports heavy commercial inventory.
- The wall is badly damaged after removal.
- You need a new custom storage system installed into studs.
- You are renovating multiple closets, retail fixtures, or warehouse areas at once.
A professional installer can assess wall structure, confirm load requirements, and ensure that a replacement system is securely mounted.
Knowing how to remove white wire shelves safely is only the first step. Whether you are updating a closet, building a more efficient stockroom, or developing a branded retail display program, the right shelving design can improve organization, product visibility, durability, and customer experience.
Waigaoqiao puts your requirements first. Since 2003, we have focused on producing metal wire racks and garment display racks for overseas brands, wholesalers, and manufacturers through OEM manufacturing. From practical white wire shelving to customized commercial display systems, our team can help turn your storage or retail concept into a scalable product solution.
Contact Waigaoqiao today to discuss your OEM wire shelving, garment rack, or metal display rack requirements.
Yes. Remove the shelf first, then take out screws, nails, or locking pins before pulling plastic clips. Pull clips straight outward and protect the wall with a putty knife or thin wood shim when using a pry tool.
Needle-nose pliers and a small flathead screwdriver are usually the most useful combination. The screwdriver lifts the fastener head, while the pliers pull out the nail pin or grip the plastic clip.
Yes. Release angled braces or support brackets before lifting out the shelf. This prevents the shelf from dropping, twisting, or bending during removal.
Pry the nail head up slightly with a small flathead screwdriver. Then grip the nail with needle-nose pliers and pull it straight out. Once the nail is removed, take out the plastic bracket.
You can reuse them if they are straight, clean, structurally sound, and free of serious rust or damaged coating. Replace bent, unstable, sharp, or heavily corroded shelving.
Remove any loose piece that comes out easily. If the remaining fragment is firmly embedded, avoid enlarging the hole by digging at it. Patch the opening, sand it smooth, prime, and repaint; in some situations, the broken anchor can be pushed into the wall cavity.
Fill small holes with lightweight spackle, let it dry, sand lightly, prime if necessary, and paint. Use a mesh patch and joint compound for larger holes or torn drywall.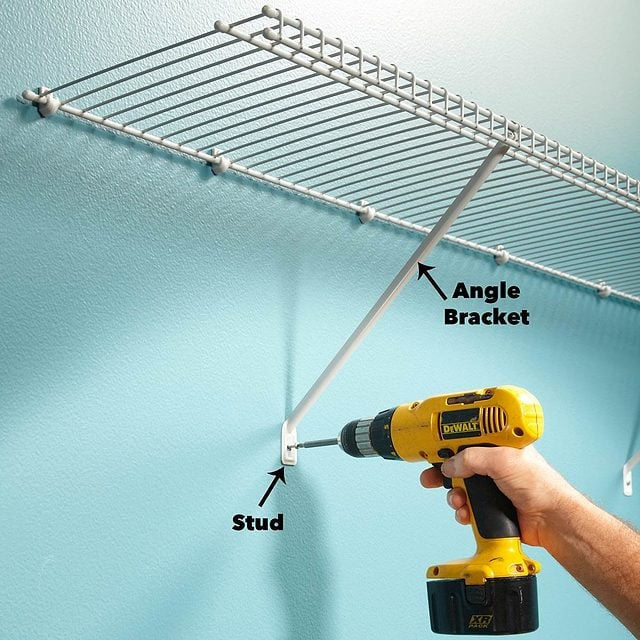
1. [How to Remove Wire Shelf Brackets Without Damage to Wall — YouTube]
2. [How to Remove Wire Shelves — Handmade Weekly]
3. [How to Remove Closet Shelf Clips and Brackets Without Damaging the Wall — DIY Stack Exchange]
4. [How to Remove Closet Wire Shelving Without Wrecking Your Walls — YouTube]
5. [How to Disassemble Wire Shelving — YouTube]
Hot Tags: China, Global, OEM, private label, manufacturers, factory, suppliers, manufacturing company


